It was one of those challenging tasks that had to be done and I felt it’s good to blog about it as well.
Task –
Extract data from a limited range of a sheet from various excel files. Each of the files have various tabs in it and the names of the tabs are not unique.
For instance, let’s say I have three excel files with the following name format – MonthlyReport_<<Month>>.xlsx where the Month is for Dec, Jan and Feb.
The data within my ‘Dec’ file is as follows –
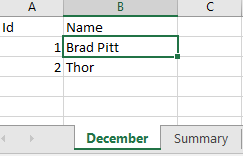
Nice, well formatted data. Let’s look at Jan’s data –
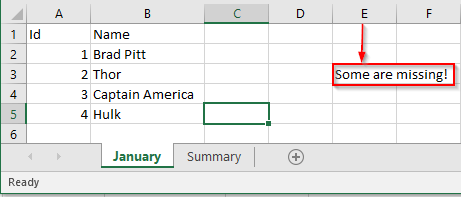
Oh, oh! somebody left a comment in the Column E. Let’s now look at the Feb’s data –
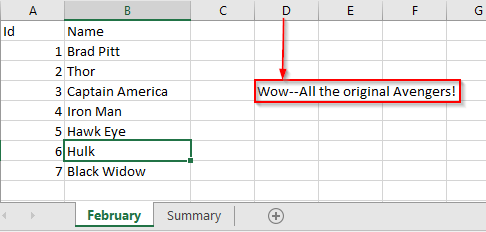
Aargh..Another person left another comment this time at Column D.
Now my task is to get all the data from Columns A and B only across all the excel files with the differently named tabs.
Solution-
The first step for us is to get all the sheet names from each of the excel files. To achieve this we need to use a macro and the steps are listed below –
- Open a new workflow. Drag in a Input tool and connect it to one of the excel files and choose the option – <List of Sheet Names> and also set the option for ‘Output File Name as Field’ to ‘Full Path’ as shown below. Setting these two options will result in two fields – FileName, Sheet Names as the output –

- Add a ‘Formula’ transform. Set the ‘FileName’ with the ‘Query’ that’s needed as shown below. The purpose of the below query is to replace the ‘List of Sheet Names’ with the actual Sheet Name and in addition to that the ‘Range’ of data to be fetched. If we don’t specify this and just stick to ‘Sheet Name’, then the workflow would fail as the data is non-uniform. This is important to take note of. I am pasting the query for easy reference. Keep in mind of the tilde character –
Replace([Filename], “<List of Sheet Names>”, “Select * from `“+[Sheet Names]+”$A1:B100000`“)

- Drag an ‘Macro Output’ and connect it to the ‘Filter’ transform.
- Drag a ‘Control Parameter’ on to the workflow. Connect the ‘search’ icon of Control Parameter to ‘lightning’ icon of the ‘Input Tool’. Doing so you would get an ‘Update Value’ transform in between both. Just leave it as is. By default it would select the ‘File – value’ as shown below. The purpose of dragging in the Control Input is to create a placeholder through which multiple excel files can be passed. If you are coming from SSIS background, you can say this is the equivalent of ‘ForEach’ file transform where the full file path is passed as a parameter.

- Save the workflow as ‘List of sheets Macro.yxmc’ and the full workflow would look like as shown below. (Note- I have added ‘Annotation’ for Control Parameter, Input Tool and Formula Tool) –

Now we have a macro which can give the full path of the excel file along with the query that we need to get the data from. We now need another macro where we can put the query in and get the data. Remember anytime we need looping, macro is the way to go. The first step we did was just getting the sheet names from each excel file and modifying the file path with the query.
The second macro to do is fairly simple –
- Open a new workflow. Drag in a ‘Input Tool’ and connect it to one of the source excel files. In my case I connected it to the ‘Feb’ file. When you connect to the file, here is how ‘Choose Table or Specify Query’ window looks like –

- Do not choose any sheet name rather click on ‘SQL Editor’ and paste the following query and click ‘OK’ – SELECT * FROM
February$A1:B100000
as shown below-
- Drag in ‘Filter’ Transform and connect to the ‘Input Tool’. In the properties, select the column ‘Id’ and set the drop down to ‘Is Not Null’. Basically if you look at the query in the above step I have given arbitrary number B100000. The data may or many not be there. So we need to filter out empty data.
- Drag in an ‘Macro Output’ and connect it to the ‘Filter Transform’ above.
- Drag in a ‘Control Parameter’ and connect the ‘search’ icon of transform to the ‘lightning’ icon of the ‘Input Data’ transform. An ‘Update Value’ transform would appear in between and you don’t need to do anything. By default it will transform the ‘File – value’ as shown below –

- Save the workflow with name say – Obtain limited range from excel.yxmc. Here is how it would look like –

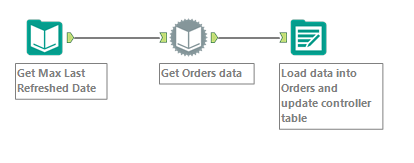
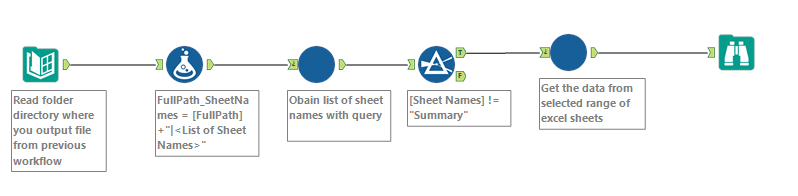
Okay, so we now have two macros, one for getting sheet names and modifying the full file path with the requisite query, the other for getting the data from the excel file. We now need another workflow to call these two macros and do our job.
- Open a new workflow. Drag in the directory tool and point the location to the path where the source files reside. Set the file specification as ‘.xlsx’ just so that we only get the excel files
- Drag in an ‘Formula’ transform and connect it to the directory tool. Add new column and give it a name say ‘FullPath_SheetNames’ and give it the following value – [FullPath]+”|<List of Sheet Names>”.
- Right-click on the blank space in the workflow, go to ‘Insert’->’Macro’ -> ‘List of Sheets’ as shown below-

- Connect the macro to the ‘Formula’ transform. In the ‘Properties’ box of the macro, set the ‘Choose list of sheets input field’ as ‘FullPath_SheetNames’. (Note- in case you have not done any annotations in the macro, then it would appear as Control Parameter Input’
- Drag in a ‘Filter’ transform and connect it to the above macro. Set the filter as – [Sheet Names] != “Summary”. This step I am doing because each of our files have two sheets and the sheet that we are interested in is not the ‘Summary’ one. I could have just put in one sheet in all files but I wanted to show you how you can if need be utilize all the sheets separately for different purposes.
- Right-click on the blank space in the workflow, go to ‘Insert’->’Macro’ -> ‘Obtain Limited range from Excel’ macro and connect it to the ‘Filter’ transform.
- In the properties of the second macro, set the value to ‘FileName’.
- Drag in a ‘Browse’ transform to look at the output. (here is where you would typically plug-in your Output Data tool in the real world scenario)
Post-running the workflow here is the output from Browse –

That’s it. For my task I had to go through about 12 different excel files with various tab names and the out-of-the-box tools that Alteryx provides is so very powerful to get the job done.
Just falling in love with it.