Import and Export Wizard – Handling Dates in Flat Files

As they say there is first time for everything. Having worked on so many packages all through my career never once I had a need to import a flat file containing dates directly from SQL Server Import and Export Wizard. It also may be a case of not having the data type set as ‘Date’ in the column and rather take it as a varchar value when doing imports.

So today as part of some task I had a requirement to import data with some date columns in it. Let’s say data for my column data looks like this in a file called DateTest.txt. Note that there is a row with blank data –


StartDate,EndDate
2017-01-01,2017-01-01

2017-05-01,2017-05-01

So I opened up the SQL Server Import Wizard, set the Data Source as – Flat File Source and browsed and obtained the File as shown below –1_SQLServerImport_General.png

Now go to Advanced and set the properties for both the columns StartDate and EndDate as ‘DT_DBDATE’ which translates to date datatype of SQL Server. For more info refer to – link. The screenshot below is for ‘EndDate’. Do the same for StartDate column as well. 2_SQLServerImport_Advanced_SetDataType.png

Set the Destination to your local Database say RnD as in my case as shown below –3_SQLServerImport_Advanced_SetDestination.png

In the ‘Select Source Tables and Views’, leave it as is and click on ‘Next>’ (This will create the table by default). Leave the defaults as is in the ‘Save and Run Package’ screen, leave the defaults and click on ‘Next>’. Click on Finish in the last page of the wizard. You will see the ‘Operation Stopped’ with ‘Copying to [dbo].[DateTest]’ set to error as shown below.

4_SQLServerImport_EndOfWizard_OperationStopped.png

If you dig further in the Messages, here is what it throws up the following error-

5_SQLServerImport_EndOfWizard_OperationStopped_ErrorMessage.png

The error states –

An OLE DB record is available.  Source: “Microsoft OLE DB Provider for SQL Server”  Hresult: 0x80004005  Description: “Conversion failed when converting date and/or time from character string.”.
 (SQL Server Import and Export Wizard)

The blank values are treated as strings and that is what the error states.

Solution 1 –

Instead of setting the data type as ‘DT_DBDATE’ set is as ‘DT_DATE’ then it will pass. There are two side-effects to this –

  • The destination column would be of type datetime instead of date.
  • All the blank values will be set as ‘1899-12-30 00:00:00.000’ as can be seen below6_SQLServerImport_Solution1_Result.png

It’s not a optimal solution. If you are just importing one file with limited columns of such type and if the destination  table on which are you are importing isn’t a large table then we can go with this approach. Depending on the use case, one can then proceed to either update the values as NULL or leave it as is.

Solution 2 –

This involves creating a package out of the same operations. Now one can go about it in the traditional way i.e. open SQL Server Data Tools (Visual Studio), add new package, drag and drop a DFT, yada yada.

Instead let’s replicate the same behavior as before. How you may say. Did you know that one can fire up a ‘SQL Server Import Wizard’ from SQL Server Data Tools itself? Now before we go further, if you have been following along, the table ‘dbo.DateTest’ in your destination should be existing.

Open a SSIS Project and go to ‘PROJECT’->’SSIS Import and Export Wizard…’ as shown below –

7_SQLServerImport_Solution2_VisualStudioProject.png

The wizard looks exactly the same as fired from SQL Server. At the end you will notice the difference. Follow the same steps that you have done earlier i.e. by setting the data as ‘DT_DBDATE’. Instead of executing, it creates a package and the final window would look like this. It will create a new package called Package1.dtsx if there isn’t one already. If there is one it would create Package2.dtsx. –

8_SQLServerImport_Solution2_VisualStudioProject_EndResult.png

At this point if you run the package that gets generated automatically as is you will get the same error. Here are the changes that are to be done.

Open the Control Flow Task – ‘Data Flow Task 1’. In the Data Flow task, open the task ‘ Source – DataTest_txt’. Ensure that ‘Retain null values from the sources as null values in the data flow’ as shown below –

8_SQLServerImport_Solution2_VisualStudioProject_RetainNull.png

Secondly double-click on the ‘SourceConnectionFlatFile’ connection manager, go to Advanced and modify the data types of StartDate and EndDate to DT_STR and length 10. Below image is shown for EndDate. Do it for StartDate as well.

20_ImportExport_AdvancedConnectionManager

Since the source connection manager is changed, the DFT – ‘Source-DataText_txt’ needs a change. Double-click on the DFT and you will be presented with the changes as shown below. Accept them.21_ImportExport_RefreshFlatFileConnectionManager

Delete the connector between Flat File and the OLE DB Destination and drag in a Derived Transform in between them. Add the following two expressions as shown below –

  • Derived Column Name  – DC_StartDate ; Expression – StartDate == “” ? NULL(DT_DBDATE) : (DT_DBDATE)StartDate
  • Derived Column Name  – DC_EndDate ; Expression – EndDate == “” ? NULL(DT_DBDATE) : (DT_DBDATE)EndDate


17_SQLServerImport_Solution2_DerivedColumnTransform.png

Connect the Derived Transform output to the OLE DB Destination and set the mappings with the newly transformed columns. 24_ImportExport_OLEDBDestinationMapping

In addition to that set the ‘Keep Nulls’ property to yes.

23_ImportExport_OLEDBDestination

That’s it. Now execute the package. All the three records would now get successfully

25_ImportExport_ExecutionResult

Data gets transferred with the blank values retained as NULL values as shown below –26_ImportExport_ExecutionResultTable

To summarize the solution, basically out-of-the box Import/Export wizard will not work with getting NULL values to date columns. Here are the changes to be done –

  • Set all the date columns for which you would want to retain NULL for blanks as String values
  • Add a Derived Transformation to change the data type of the data to DT_DBDATE.
  • Set the retain null property at both source and destination to yes.

Solution 3 –

The ideal solution should be the one wherein one can use DT_DBDATE at the source itself and it should go through to destination. For some reason I have been getting strange errors while doing it as shown below –

Error:Year, Month, and Day parameters describe an un-representable DateTime.

. I am still working on it. Once I get a better solution, will post it here.


Informatica 101 – Staring the first mapping

At this point I am assuming you have been able to successfully install the Informatica 9.6.1 legally by following the steps listed out in this article – link. 

First let’s define the problem statement.

Task –

Load data from a table into a flat file. The table data that I am loading is from the good old AdventureWorks . Here is the query which I have stored in a view – Person.vw_GetTop10Persons –

select top 10 BusinessEntityID
,FirstName
,LastName
from Person.Person
order by BusinessEntityID;

Steps –

Open the PowerCenter Repository and connect to the the Repository that you have created. Go to ‘Folder’->’Create’ and give it a name say ‘InformaticaLearning’ and click on ‘OK’ as shown below

.CreateRepositoryFolder.png

Click on Start and open up the PowerCenter Designer and connect to the ‘Repository’. The ‘InformaticaLearning’ project that we created in the previous step would now appear. Right-Click on the folder and click ‘Open’ as shown below. This is how a project is opened                                 Opening project from Repository

Unlike SSIS wherein you drag a Data Flow Task and within which you start creating source and destination, the process here is to create sources and destinations as separate entities. First step is to create a Source. Go to Sources->Import from Database as shown below –

SourceImportDatabase

In the ‘Import Tables’ window, click on the ellipsis button. The ODBC Source Administrator(32-bit) window pops up. Click ‘Add’ and in the ‘Create New Data Source’ Window scroll down to the appropriate SQL Server client and click on ‘Finish’. I have SQL Server 2014 as well as SQL Server 2008R2 and the driver that I am choosing is SQL Server Native Client 11.0. as seen belowCreatingSourceFromImportTables.png

The following screens give an indication of the next steps in creating the data source.
NewDataSource_1NewDataSource_2                                     
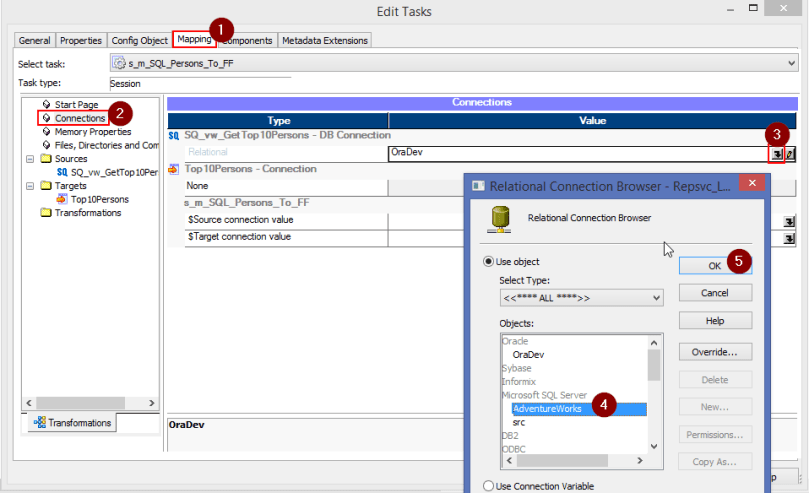
Ensure to change the default database to the actual  Database from which you are sourcing the data which in this case is – AdventureWorks2014NewDataSource_3.png

NewDataSource_4

NewDataSource_Finish

The ‘User Data Sources’ should now contain ‘AdventureWorks’. Click on ‘OK’. You will again get back to the original ‘Import Tables’ window. Here you would need to select the source again from the drop-down and click on ‘Connect’. All the tables would appear in the ‘Select tables’ window.ImportTables_Tables.png

In the ‘Search for tables named:’ section type the name of the view – vw_GetTop10Persons and click on ‘Search’. The narrowed result will now appear. Now click on ‘OK’ as shown below – ImportTables_Tables_2

The ‘Source’ is set. Now let’s create the destination. Go to Tools->Target Designer. Now go to ‘Targets’->’Create’ as shown below. – Targets_Create_NewTarget.png

In the ‘Create Target Table’ window, enter the name for the target say ‘Top10Persons’ and for ‘Select a database type:’ select it as ‘Flat File’ and click on ‘Create’ and then press ‘Done’ once done.

Targets_Create_NewTarget_2.png

You now need to define the column details. Double-Click on the newly created table and define the column details. You may be wondering where to put the file path right? It’s not done here. It is done at the ‘Workflow’ level – Targets_Create_NewTarget_3.png

Now go to ‘Tools’ -> ‘Mapping Designer’. Click on ‘Mappings’->’Create’ as shown below and give it a name m_SQL_Persons_To_FF and click on ‘OK’

Mappings_Create

In the ‘Mapping Designer’ pane, drag and drop the source – vw_GetTop10Persons on to the ‘Designer’ as shown below just same as how we drag and drop Data Flow Components. You would see that the source would appear along with additional ‘SQ’ block. This is called ‘Source Qualifier’. This is basically used as a stop for homogenizing all the source data. Every source when dragged gets a source qualifier associated. We will see more on that later on.  Here is the window of the Source along with the Source Qualifier – Mappings_Create_2Mappings_Create_3

Right-Click on any column in the Source Qualifier and click on ‘Select All’  Mappings_Create_4

Click on the Square box beside the column ‘BusinessEntityID’ in the selected list and drag it to the exact column ‘BusinessEntityId’ at the destination as shown below.Mappings_Create_5

Once done, the mappings between both the items will be seen.Mappings_Create_6

Click on ‘Mappings’->Validate and the following information would appear giving the results of the validation.Mappings_Create_SaveResults

Next step is creating a ‘Workflow’ for this as this can’t run independently. Go to Mappings->Generate Workflow as shown below -.                                                           Workflow_Generate

In the ‘Workflow Generation’ window, accept the default and click on ‘Next>’ until the 4th step and then click on ‘Finish’.

Go to Tools->Workflow Manager. Expand the ‘Workflows’ and one can find the newly created ‘wf_m_SQL_Persons_To_FF’. Right-click and click on ‘Open’ as shown below –

Workflow_Start.png

We first need to create the ‘Data Sources’ again this time for ‘AdventureWorks’. Go to ‘Connections’->’Relational’. Click on ‘New’ –

1_RelationalConnection.png

In the ‘Select Subtype’ window, click on ‘Microsoft SQL Server’ and click on ‘OK. New Connection Object Definition opens. Note that this is entirely different from the ODBC source that you had configured while creating it in the Designer. For attributes the following details have to be supplied as highlighted.

2_RelationalConnection.png

Click on ‘OK’ and then with the newly created object ‘AdventureWorks’ selected click on ‘Close’.

Double-click on the session object ‘s_m_SQL_Persons_To_FF’. The ‘Edit Tasks’ window will now appear. Go to ‘Mapping’ tab and click on ‘Connections’. For the SQ type, we need to change the value to the one we just created. So click on the down arrow button as shown below and select on ‘AdventureWorks’ in the ‘Relational Connections Browser’ pop-up.

3_RelationalConnection.png

We now need to configure the Flat File Connection details. For this click on ‘Files, Directories and Commands’.Give the values for ‘Output file directory’ and ‘Output filename’ as shown below

4_RelationalConnection.png

Go to ‘Workflows’->Validate and ensure there are no errors. Click on ‘Ctrl-S’ to save. Again go to ‘Workflows’->Start Workflow. To understand the progress of the Workflow, we need to check in the PowerCenter Monitor. Click on Tools->Workflow Monitor and navigate to the project and the workflow.

You will get a Gantt Chart view of the run indicating the success as seen below –

5_RelationalConnection.png

And that my friends is how we create a ‘Hello World’ equivalent of package in Informatica. Looks complicated isn’t it? Slowly, you will get used to it.

Next post is all about how to generate a dynamic file naming.

Informatica 101 – How it compares to SSIS

Recently as part of my project I had a chance to finally get a hands on Informatica and how it does the standard ETL. The work that I was given was mostly to validate the counts by opening up the transformations and the actual counts that were obtained after the workflows were run. It really piqued my interest and I wanted to get a real hang of it.

So I took up the course ‘Informatica PowerCenter 9.X Developer & Admin’ in Edureka thanks to sponsorship by my current company. Over 2 weeks and with 3 hrs per week I felt I have grasped sufficient information. We had a good trainer that talked us through various aspects of the tool. He kept a use case, explained us what is it we are trying to achieve and then give a walk-through of the whole process which I could then replicate on my own.

At the end of the course we were given a small project to load a data warehouse with some dimensions of type 1 and some of type 2 into a single fact table which I completed comfortably.

Having over a decade of experience in SSIS, my mind was constantly comparing both and at the moment I feel performing certain simple tasks in Informatica are very hard compared to SSIS. So here goes some of the mental notes –

Tool Overview –

  • You need, brace for it, 4 separate tools to develop, deploy and monitor the ‘workflows’ a.k.a packages in SSIS.
    • Informatica PowerCentre Repository Manager- The place where you need to create the project similar to how one creates project in SSIS. That’s where it ends though. One cannot do any development here. This is the tool that one mainly uses to either import/export objects. Additionally I can see that it also gives a detailed info on various objects (will talk about it in future posts) such as Data Type, Precision, Key Type etc.
    • Informatica PowerCentre Designer – This is the tool where the actual development happens. Here is where you create your sources, destination, transformations/mappings. The end product out of designer is a mapplet which is a culmination of Source, Transformation and Destination. In SSIS parlance, developing a package with only Data Flow tab available.
    • Informatica PowerCentre Workflow Manager – All the mappings that were created in the designer need to be brought into the workflow. Prior to that we would first create a session, select the appropriate mapping. In SSIS parlance, one can say having just the Control Flow tab available.
    • Informatica PowerCentre Monitor – Once you create the workflow, here is where you need to connect and run the workflows, monitor the output, restart if needed. This plays the role of SQL Server Agent.
  • It is a metadata driven tool i.e. when the tool is installed you would need to specify the database on which it needs to be hosted where it creates all the tables, stored procedures, views etc. This is called Informatica PowerCenter Administrator console.

Dislikes –

  • No ‘Test Connection’ – Unlike in SSIS where sources and destinations are intrinsic to the package, here they are separate components of the project. Starting from SSIS 2012 with the advent of Project Parameters, this feature should sound familiar. The pain point though is that when you create OLE DB Sources/ Destinations there is no ‘Test Connection’ button to validate.
  • Re-creation of Source/Destination – As I was detailing earlier, your core development happens in PowerCenter Designer where. Once you are done you need to open the PowerCenter Workflow, create a session for the mapplet from Designer. Here again when it comes to OLE DB Sources/ Destination you would need to create again! It doesn’t come right away.
  • Disconnect-Reconnect – Let’s say you start with a mapplet. You create a workflow for it. So you will have two tools open – Designer as well as a Workflow. From the Workflow Manager you execute it and that’s about it. Let’s say you start to work on new mapplet. From the Workflow Manager you would need to disconnect and then reconnect to see the newly created workflow.
  • Dynamic File Naming – It’s just so hard. In SSIS, it’s all about getting the ConnectionString attached to a variable and that’s about. Here you would need at least 4 variables to do that.
  • No Loop Containers – There is absolutely no looping containers such as For Loop, Foreach Loop containers available. At this moment I don’t even know what the replacements are.
  • No Stored Procedure data as a source – Out of the box this just can’t be done. Again like above it doesn’t have a straightforward way.
  • No Data Viewers


Likes –

  • Component Re-usability – One can create a component and have it re-used across various mapping. This is what they call Transformations.
  • Ability to connect to any data source – Unlike SSIS, which is a beauty when it comes to SQL Server Destination and a beast when dealing with others, Informatica makes it a breeze no matter what source and destinations there are

The journey has just begun. In my next post I will give a detail on how to start one simple package and get it executed in Informatica in comparison with SSIS. Meanwhile I am also looking to see who I can get to work on Looping / Stored Procedure.