I had an interesting business problem to solve and wanted to share on how this can be achieved.
Business Problem
On daily basis a zip file containing various flat files is dropped at a file location. Contents of the flat files are to be read and extracted. All the files have the same metadata.
File names within the zip file are dynamic.
Solution
Alteryx provides out of the box Input tool for working with zip files. All one needs to do is drag and drop the zip file on to the canvas and tool itself will pop-up asking which files to be extracted as shown below.
Pop-up image when dragging a Zip file on to the canvas.Read More »
Once the base Macro is set, we now need another macro which can spit out the sheet names from a given excel file. Perform the following steps to create this macro – 1. Drag in ‘Input Tool’ and connect to any of the existing excel file say ‘Movies.xlsx’. On connection, chose the option – Import only the list of sheet names ( as shown below ). Additionally in the configuration pane of the tool set ‘Output File Name as Field’ to ‘Full Path’
2. Drag in a ‘Formula’ tool and create a new field ‘FullPath’ with the following formula TrimRight([FileName],'<List of Sheet Names>’)+”‘”+[Sheet Names]+”$’” 3. Drag in a ‘Select’ tool and deselect everything but the ‘FullPath’ field. 4. Drag in a ‘Macro Output’. Here is how it should look like –
Run the workflow and ensure full path is being shown –
As the title states, the requirement is simple – Extract max date from multiple excel files with varying schemas. I had a task where the requirement was to go through about 30 odd excel files and pick max date from each of them for monitoring purpose. All the files do not have necessarily have same schemas i.e. same number of columns or sheet name for that matter.
Just looking at the requirement, I knew this is a cakewalk for Alteryx. You see once you get a small taste of how a macro works, you will begin to realize the incredible power of the ability to customize every single component of the workflow – input tool, output tool, filter, join. Anything, you just name it, it will do it for you. It will put those tiny black thingy on the controls and hallelujah! you are set.
I did some simple mind calc and bam, I knew I could rig this up effortlessly.
Without any further ado, let’s get into this with an example. Like every other person out there I consume a lot, I mean a LOT of audio/movie content be it movies, series or podcasts. So I have three files now to keep track of these –
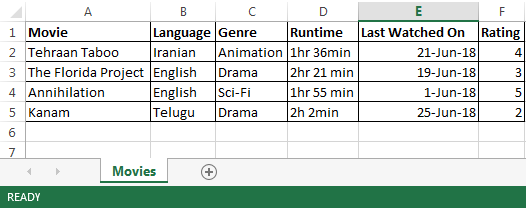
1. Movies Seen.xlsx containing the following data-
2. Series Seen.xlsx containing the following data –
3.Podcasts Heard.xlsx containing the following data –
As can be seen all the files above are having different column names and different sheet names too. My goal is to get when was the last movie that I saw or series I saw or podcast I heard.
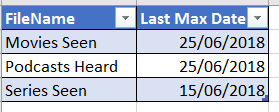
Here is the expected result –
Solution –
My first step was to create a lookup file – media_config_data.csv which looks like below –
We will make use of this later. First let’s create one simple workflow that gives the max date from one of the files above i.e. Movies Seen.xlsx. Here is the screenshot of the base workflow –
The workflow does following things – 1. Use ‘Input Data’ and connect to the excel file. 2. Add a ‘Formula Tool’ and create new column ‘Max Date’ and set it to ‘Last Watched On’ 3. Add a ‘Select’ transform and deselect all the columns excepting the ‘Max Date’ and ‘File Name’ column 4. Add a ‘Summarize’ transform and set it as ‘Last Max Date’ 5. Generates a dummy output
Ensure that the workflow works without any error. The next step is to create a ‘macro’ out of it. Some of ‘comments’ in the above screen shot should give an idea of what is going to happen.
Step 1 – Macro to obtain Max of Date column
Perform the following steps to create the macro. This is where the actual magic happens – 1. Drag in three ‘Control Paramters’ on to the canvas and set the labels as – Excel Name, Sheet Name, Date Column Name. 2. Connect the ‘Excel Name’ control parameter’s magnifying glass to lightning strike of ‘Input Tool’. An ‘Update value’ action tool will popup. 3. Perform the following actions on selecting the ‘Update value’ tool as shown below –
4. Perform the steps (2) and (3) for Sheet Name control parameter and in following through ‘Replace a specific string:’ Movies. 5. Now connect the ‘Date Column Name’ control parameter to the lightning strike of ‘Formula’ tool and perform the actions as seen below –
6. Lastly remove the ‘Output’ tool and connect ‘Macro output’. 7. Save the file as ‘Obtain Max Date from Excel File’.
Here is how the macro would like like once done –
Step 2 – Workflow to process the files This workflow is where we use Directory tool, to obtain all the excel files and get file name and full file path, join it up with config file and obtain the three variables that the above macro needs – 1. Excel Name 2. Sheet Name 3. Date Column Name Here is how the workflow would look like –
On running the workflow, we get the desired output as shown below –
While working on one of the workflows of Alteryx with PostgreSQL data sources, I started getting this wierd error –
Error SQLExecute: Out of memory while reading tuples.; memory allocation error???
This was a unusual error. For one I was running this not on my local machine but on the Gallery which was governed by the server. Also I felt Alteryx folks could have done away with three question marks (???). It feels as if we are being questioned on the memory allocation and it’s just waiting for some confirmation.
This is one of those classic it-works-in-dev-not-in-prod kind of problem. I then went back and compared the two ODBC data source settings across both the environments. It was here I could see the problem. You need to set the setting for PostgreSQL ODBC data source to have ‘Use Declare/Fetch’ option set in.
Open up the ‘ODBC Data Source Administrator’ window after running it as administrator. Click on the ‘Data Source’ that you are using and click on ‘Configure’. In the ‘PostgreSQL ANSI ODBC Driver (psqlODBC) Setup’ window, click on ‘Datasource’. Ensure that the checkbox ‘Use Declare/Fetch’ is checked and then click on ‘OK’ and close the subsequent windows. This setting resolves the issue. Below is the screenshot
Figuring out how to run Powershell scripts using Alteryx has been a very harrowing experience for me. I had used ‘Run command’ tasks before but I remember even then it was quite a struggle to get it up and running.
The help files from Alteryx with regards to this task is abysmal. It gives an explanation of each task within the command but doesn’t really tell you how to go about doing it step by step. The nearest help from Alteryx forum that I could get is this. Here is my attempt to make it easier for folks who find themselves in similar situation.
Task Description
I need to create a sub-folder under multiple folders. This ‘sub-folder’ name is dynamically determined during run-time depending on the input file name to the workflow.
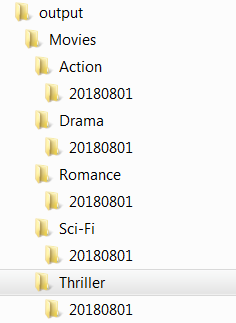
For example, say my input file is – movies_released_20180801.csv. I have a set of folders under the parent directory – Movies as shown below –
I need to create a folder called ‘20180801’ under each of the sub-folders, if it doesn’t exist already. As each month passes, new sub-folders would need to be created.
Solution My first step for the solution is to create a powershell script that can perform the sub-folder creation. Here is my script –
#Get Parent directory
$root = "C:\Users\kvankada\Documents\Personal\Learning\output\Movies"

#Get all directories present in the parent folder
$folders = Get-ChildItem -Path $root -Directory

#Iterate through each item within the list of parent folder
foreach($folder in $folders)
{
  #Get the subfolder full path
  $Subfolder = $folder.FullName + "\20180801"

   #Check to see if the folder exists
   if(! (Test-Path -Path $Subfolder))
   {
      #If it does not exist, create new sub-folder under each item
      New-Item -ItemType directory -Path $Subfolder
   }
}
The root folder of the above script file comes from the Alteryx workflow. The next steps now starts looking crazy but bear with me. It will all make sense. Drag in a ‘Input Task’ with following two columns –
The Path should be a valid path and accessible to the user. It can be a UNC path as well. Drag in a ‘Formula’. Create two new columns Subfolder and Powershell_Script with following values as shown below –
As can be seen the new column Powershell_Script is nothing but the entirety of powershell script with ‘Subfolder’ being dynamically sent. Drag in a ‘Select’ task. De-select all the fields excepting ‘Path’ and ‘Powershell_Script’. Drag in a ‘Run Command’ task. Click on ‘Output’ under ‘Write Source [Optional]’ in the configuration window as shown below –
In the ‘Write to File or Database’ file, click on the drop-down and select ‘File’. A ‘Save a data file’ window pops up. Here chose any location and save the file as say ‘temp_powershell.csv’. I have chosen a ‘temp’ folder as my file location. In the ‘Alterx Designer’ the following changes still needs to be done against following settings –
Delimiters – \0
First Row Contains Field Names – Unchecked
Quote Output Fields – Never
Take File/Table Name From Field – Tick the checkbox. Chose the option as ‘Change Entire File Path’ Field Containing File Name or Part of File Name – Path Keep Field in Output – Unchecked
The final dialog would look like as shown below. Changes have been highlighted. Click on ‘OK’ post completion –
The reason we need to do this is because Alteryx doesn’t provide a way to save the output to Powershell script file. We need to get the content of Powershell first saved as CSV and then the whole file being renamed via our ‘Path’ value that we have provided in the workflow. It’s a roundabout way of doing things.
Continuing the ‘Run Command’ Task configuration and set them as shown below. Pay particular attention to double quotes in the ‘Command Arguments [Optional]’ section. It is absolutely necessary.-
That’s it. Now you are set to run. There is no need to configure the output of ‘Run Command’ task. If you do need to use, then ‘Read Results’ path needs to be configured. I might do a continuation post later on for that. For now you can ignore the need for additional output configuration. Here is how the final workflow looks like –
I ran the workflow and here is my output –
For final workflow in the ‘Run Command’ task, you would need to set ‘Run Minimized’ and ‘Run Silent’ check boxes to have smoother run. As you are testing out, it would be important for debugging purpose to leave them unchecked. In that manner you would see if you have any errors popping out.
That’s it. That’s how it is done in Alteryx. It took me quite a lot of tinkering and experimenting to get the desired result. Hope this post has helped in solving your own problems while getting Powershell scripts run via Alteryx.