At this point I am assuming you have been able to successfully install the Informatica 9.6.1 legally by following the steps listed out in this article – link.
First let’s define the problem statement.
Task –
Load data from a table into a flat file. The table data that I am loading is from the good old AdventureWorks . Here is the query which I have stored in a view – Person.vw_GetTop10Persons –
select top 10 BusinessEntityID
,FirstName
,LastName
from Person.Person
order by BusinessEntityID;
Steps –
Open the PowerCenter Repository and connect to the the Repository that you have created. Go to ‘Folder’->’Create’ and give it a name say ‘InformaticaLearning’ and click on ‘OK’ as shown below
.
Click on Start and open up the PowerCenter Designer and connect to the ‘Repository’. The ‘InformaticaLearning’ project that we created in the previous step would now appear. Right-Click on the folder and click ‘Open’ as shown below. This is how a project is opened 
Unlike SSIS wherein you drag a Data Flow Task and within which you start creating source and destination, the process here is to create sources and destinations as separate entities. First step is to create a Source. Go to Sources->Import from Database as shown below –

In the ‘Import Tables’ window, click on the ellipsis button. The ODBC Source Administrator(32-bit) window pops up. Click ‘Add’ and in the ‘Create New Data Source’ Window scroll down to the appropriate SQL Server client and click on ‘Finish’. I have SQL Server 2014 as well as SQL Server 2008R2 and the driver that I am choosing is SQL Server Native Client 11.0. as seen below
The following screens give an indication of the next steps in creating the data source.

 Ensure to change the default database to the actual Database from which you are sourcing the data which in this case is – AdventureWorks2014


The ‘User Data Sources’ should now contain ‘AdventureWorks’. Click on ‘OK’. You will again get back to the original ‘Import Tables’ window. Here you would need to select the source again from the drop-down and click on ‘Connect’. All the tables would appear in the ‘Select tables’ window.
In the ‘Search for tables named:’ section type the name of the view – vw_GetTop10Persons and click on ‘Search’. The narrowed result will now appear. Now click on ‘OK’ as shown below – 
The ‘Source’ is set. Now let’s create the destination. Go to Tools->Target Designer. Now go to ‘Targets’->’Create’ as shown below. – 
In the ‘Create Target Table’ window, enter the name for the target say ‘Top10Persons’ and for ‘Select a database type:’ select it as ‘Flat File’ and click on ‘Create’ and then press ‘Done’ once done.

You now need to define the column details. Double-Click on the newly created table and define the column details. You may be wondering where to put the file path right? It’s not done here. It is done at the ‘Workflow’ level – 
Now go to ‘Tools’ -> ‘Mapping Designer’. Click on ‘Mappings’->’Create’ as shown below and give it a name m_SQL_Persons_To_FF and click on ‘OK’

In the ‘Mapping Designer’ pane, drag and drop the source – vw_GetTop10Persons on to the ‘Designer’ as shown below just same as how we drag and drop Data Flow Components. You would see that the source would appear along with additional ‘SQ’ block. This is called ‘Source Qualifier’. This is basically used as a stop for homogenizing all the source data. Every source when dragged gets a source qualifier associated. We will see more on that later on. Here is the window of the Source along with the Source Qualifier – 

Right-Click on any column in the Source Qualifier and click on ‘Select All’ 
Click on the Square box beside the column ‘BusinessEntityID’ in the selected list and drag it to the exact column ‘BusinessEntityId’ at the destination as shown below.
Once done, the mappings between both the items will be seen.
Click on ‘Mappings’->Validate and the following information would appear giving the results of the validation.
Next step is creating a ‘Workflow’ for this as this can’t run independently. Go to Mappings->Generate Workflow as shown below -. 
In the ‘Workflow Generation’ window, accept the default and click on ‘Next>’ until the 4th step and then click on ‘Finish’.


Go to Tools->Workflow Manager. Expand the ‘Workflows’ and one can find the newly created ‘wf_m_SQL_Persons_To_FF’. Right-click and click on ‘Open’ as shown below –

We first need to create the ‘Data Sources’ again this time for ‘AdventureWorks’. Go to ‘Connections’->’Relational’. Click on ‘New’ –

In the ‘Select Subtype’ window, click on ‘Microsoft SQL Server’ and click on ‘OK. New Connection Object Definition opens. Note that this is entirely different from the ODBC source that you had configured while creating it in the Designer. For attributes the following details have to be supplied as highlighted.

Click on ‘OK’ and then with the newly created object ‘AdventureWorks’ selected click on ‘Close’.
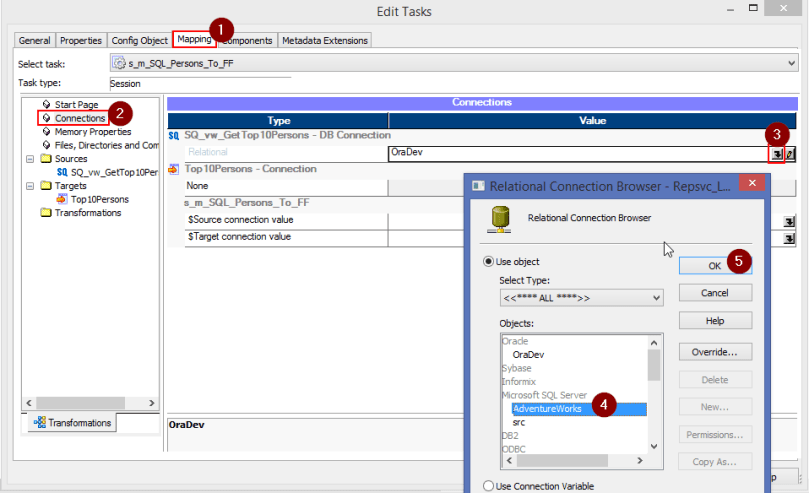
Double-click on the session object ‘s_m_SQL_Persons_To_FF’. The ‘Edit Tasks’ window will now appear. Go to ‘Mapping’ tab and click on ‘Connections’. For the SQ type, we need to change the value to the one we just created. So click on the down arrow button as shown below and select on ‘AdventureWorks’ in the ‘Relational Connections Browser’ pop-up.
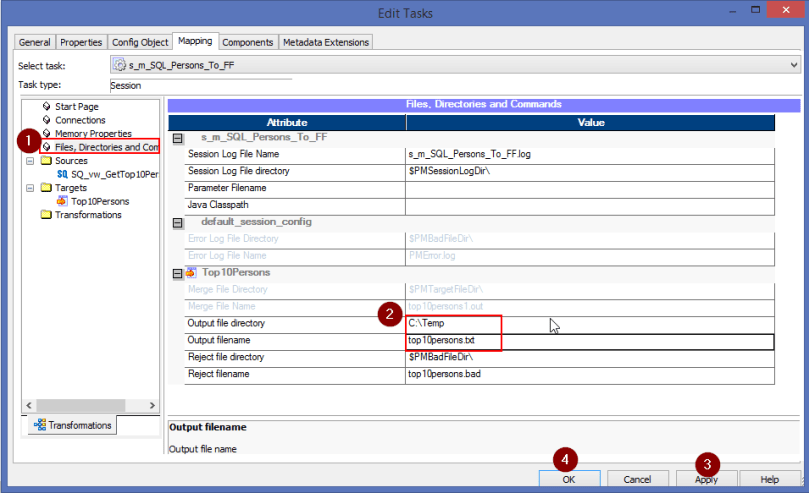
We now need to configure the Flat File Connection details. For this click on ‘Files, Directories and Commands’.Give the values for ‘Output file directory’ and ‘Output filename’ as shown below
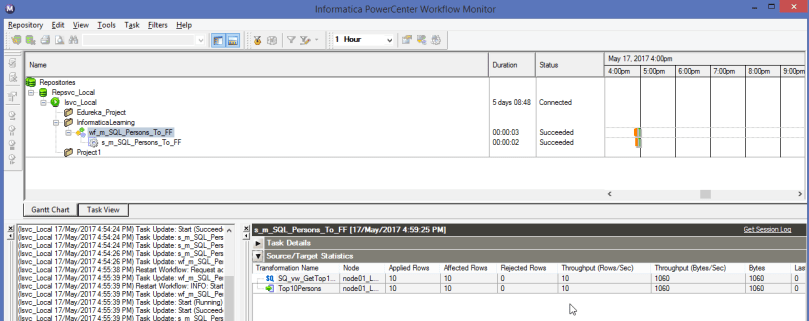
Go to ‘Workflows’->Validate and ensure there are no errors. Click on ‘Ctrl-S’ to save. Again go to ‘Workflows’->Start Workflow. To understand the progress of the Workflow, we need to check in the PowerCenter Monitor. Click on Tools->Workflow Monitor and navigate to the project and the workflow.
You will get a Gantt Chart view of the run indicating the success as seen below –
And that my friends is how we create a ‘Hello World’ equivalent of package in Informatica. Looks complicated isn’t it? Slowly, you will get used to it.
Next post is all about how to generate a dynamic file naming.

[…] here and there), we had many a arguments on which is better and why. As I stated out in my first post about Informatica, I didn’t have good feelers with it when starting out. There were too many […]