Alteryx – Max Date from multiple excel files with varying schemas

As the title states, the requirement is simple – Extract max date from multiple excel files with varying schemas. I had a task where the requirement was to go through about 30 odd excel files and pick max date from each of them for monitoring purpose. All the files do not have necessarily have same schemas i.e. same number of columns or sheet name for that matter.

Just looking at the requirement, I knew this is a cakewalk for Alteryx. You see once you get a small taste of how a macro works, you will begin to realize the incredible power of the ability to customize every single component of the workflow – input tool, output tool, filter, join. Anything, you just name it, it will do it for you. It will put those tiny black thingy on the controls and hallelujah! you are set.

Alteryx Designer x64 - Macros_configuration.png

I did some simple mind calc and bam, I knew I could rig this up effortlessly.

Without any further ado, let’s get into this with an example. Like every other person out there I consume a lot, I mean a LOT of audio/movie content be it movies, series or podcasts. So I have three files now to keep track of these –

1. Movies Seen.xlsx containing the following data-

Alteryx Designer x64 - Blog_Excel_Movies_Sample

2. Series Seen.xlsx containing the following data –

Alteryx Designer x64 - Blog_Excel_Series_Sample

3.Podcasts Heard.xlsx containing the following data –

Alteryx Designer x64 - Blog_Excel_Podcasts_Sample

As can be seen all the files above are having different column names and different sheet names too. My goal is to get when was the last movie that I saw or series I saw or podcast I heard.

Here is the expected result –
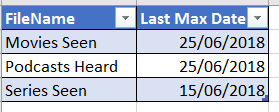
Solution –

My first step was to create a lookup file – media_config_data.csv which looks like below –

Alteryx Designer x64 - Blog_Config_Data

We will make use of this later. First let’s create one simple workflow that gives the max date from one of the files above i.e. Movies Seen.xlsx. Here is the screenshot of the base workflow –

The workflow does following things –
1. Use ‘Input Data’ and connect to the excel file.
2. Add a ‘Formula Tool’ and create new column ‘Max Date’ and set it to ‘Last Watched On’
3. Add a ‘Select’ transform and deselect all the columns excepting the ‘Max Date’ and ‘File Name’ column
4. Add a ‘Summarize’ transform and set it as ‘Last Max Date’
5. Generates a dummy output

Ensure that the workflow works without any error. The next step is to create a ‘macro’ out of it. Some of ‘comments’ in the above screen shot should give an idea of what is going to happen.

Step 1 – Macro to obtain Max of Date column

Perform the following steps to create the macro. This is where the actual magic happens –
1. Drag in three ‘Control Paramters’ on to the canvas and set the labels as –
Excel Name, Sheet Name, Date Column Name.
2. Connect the ‘Excel Name’ control parameter’s magnifying glass to lightning strike of ‘Input Tool’. An ‘Update value’ action tool will popup.
3. Perform the following actions on selecting the ‘Update value’ tool as shown below –

4. Perform the steps (2) and (3) for Sheet Name control parameter and in following through ‘Replace a specific string:’ Movies.
5. Now connect the ‘Date Column Name’ control parameter to the lightning strike of ‘Formula’ tool and perform the actions as seen below –

6. Lastly remove the ‘Output’ tool and connect ‘Macro output’.
7. Save the file as ‘Obtain Max Date from Excel File’.

Here is how the macro would like like once done –

Step 2 – Workflow to process the files
This workflow is where we use Directory tool, to obtain all the excel files and get file name and full file path, join it up with config file and obtain the three variables that the above macro needs –
1. Excel Name
2. Sheet Name
3. Date Column Name
Here is how the workflow would look like –

On running the workflow, we get the desired output as shown below –

Alteryx App- Adding (Select All) to Dropdown

One of the most common requirement that comes when creating Alteryx Apps involving a dropdown is to have (Select All) as one of the values. This value, if you have not inferred by now, would not be part of a data source but something we add to it. Basically I am trying to simulate what Excel does when ‘Sort & Filter’ is enabled as seen below – 

2019-02-07 11_39_50-Marvel Movies Box Office Report.xlsx - Excel

In this post I am going to demonstrate how to add this value in the drop down and how it then needs to be consumed in filtering the datasource. This post will have the following sections –

  1. Get Dummy Data
  2. Add (Select All) to Dropdown tool
  3. Filter dataset using the ‘(Select All)’

1. Get Dummy Data

The test data which I am going to use for this post is the highest grossing Marvel Movies which I am getting from this link – Marvel Comics Movies at Box Office. I copied the first table and stored it in my local disk. In my Alteryx App, I have dragged this data as a Input Tool. Used DateTime Tool and Filter to create a unique Date Format.

Sample Data is shown below –

2. Create Filter with (Select All) in it

As next step I am going to create one Dropdown filter – ‘Studio’. For this post I am choosing the option – Manually set values (Name:Value – one per line). I have entered the values manually. As you can see I have kept the option ‘(Select All)’ as the first entry. 

2019-02-07 11_55_37-Alteryx Designer x64 - Test Workflow - Blog.yxwz_.png

If the data is coming via connected tool, ensure that source data for the filter is joined with the ‘(Select All)’ manual text data. Likewise, if it’s coming from external source, add this entry. Essentially because this value doesn’t exist, we would need to add it.

3. Filter dataset using the ‘(Select All)’

We identified our column on which we need to filter. We have created the values for the filter. It is now time to actually ‘filter’. I have now dragged in a Filter transform. Too much repetitive, isn’t it. I will now ‘filter’ (pardon the pun) going forward. Put the following entry for the ‘Customer Filter’ option as shown below –

2019-02-07 12_05_27-Alteryx Designer x64 - Test Workflow - Blog.yxwz_.png

Here is what we need to do next –
1. Connect the ‘search’ icon of ‘Studio’ dropdown to the lightning bolt of ‘Filter on Studio’ Operator. A ‘Update value’ operator pops up in between.
2. Click on the operator. Under the ‘Value or Attribute to Update:’ section, click on “Expression – value = ….”
3. Click on the checkbox ‘Replace a specific string:’ and just keep the value as ‘<studio>’ (without quotes) as can be seen below- 

2019-02-07 12_14_02-Alteryx Designer x64 - Test Workflow - Blog.yxwz_.png

That’s it. Essentially the logic here is the inclusion of OR expression of place holder value equal to ‘(Select All)’. When a specific filter is selected, the select all expression goes false and when ‘(Select All)’ option is selected, well this one gets true and essentially the filter will flow through all the data.

Same logic can be used for filtering the data say in a Dynamic Input with data coming from a particular SQL data source. Code for that would look like this – 

select *
from  really_awesome_table2019-02-07 14_18_14-Alteryx Designer x64 - Select All - Filter implementation.yxwz.png
where (
           that_parameter  = ‘<this_value>’
            or
           ‘(Select All)’ = ‘<this_value>’
          )

To test it out I have put in a summarize transform to group by ‘Studio’ and ‘Total Movies’. Let’s run the workflow.  Here is how the wizard looks like –

2019-02-07 14_20_04-Alteryx Designer x64 - Select All - Filter implementation.yxwz.png
Here is how the output looks like, executing with (Select All) and individual Filter –


Alteryx InboundNamedPipe::ReadFile: Not enough bytes read error – Postgres

Yet another strange day to be in. I kept getting the following error –

Error – The Designer x64 reported: InboundNamedPipe::ReadFile: Not enough bytes read. The pipe has been ended

I tried several methods – clearing of temp files, restarting alteryx, restarting my system multiple times, logging on and logging off etc to no avail. It just kept failing.

What added to the confusion is, it was happening only for few tables whose volumes are much smaller in size. I mean to say Table 1 with about ~20M records from the same database, we were able to extract successfully whereas from Table 2 with only ~3.5M we were facing this problem. Seemed really strange. The good old internet hadn’t turned up with anything useful and neither the Alteryx Forums. All the info that I got was that during one stage of workflow , it was running into error.

The case for me though is in my workflow apart from the ‘Input Tool’ from where I was pulling in the data and the ‘Output Tool’, there was nothing in between. Still it was failing.

Anyway I just took a break, thought for a while and said to myself – “When was the last time you had such strange error with Alteryx and Postgres combo?” Oh yeah, right here.

Hmm, why not try the same fix? I sure did and you know what! It just god darn works! Don’t even ask me how or why, it works. So gents and ladies, here is the fix you gotta do –

Go to the, Pre SQL Statement of your Alteryx ‘Input Tool’ and insert the following –

set client_encoding to ‘UTF-8’

As simple as that! Thank me later.

Alteryx – Extract data from various excel files with various tab names

It was one of those challenging tasks that had to be done and I felt it’s good to blog about it as well.

Task –
Extract data from a limited range of a sheet from various excel files. Each of the files have various tabs in it and the names of the tabs are not unique.

For instance, let’s say I have three excel files with the following name format – MonthlyReport_<<Month>>.xlsx where the Month is for Dec, Jan and Feb.
The data within my ‘Dec’ file is as follows –
1_srcExcel_Dec

Nice, well formatted data. Let’s look at Jan’s data –
1_srcExcel_Jan

Oh, oh! somebody left a comment in the Column E. Let’s now look at the Feb’s data –
1_srcExcel_Feb
Aargh..Another person left another comment this time at Column D.
Now my task is to get all the data from Columns A and B only across all the excel files with the differently named tabs.

Solution-
The first step for us is to get all the sheet names from each of the excel files. To achieve this we need to use a macro and the steps are listed below –

  1. Open a new workflow. Drag in a Input tool and connect it to one of the excel files and choose the option – <List of Sheet Names> and also set the option for ‘Output File Name as Field’ to ‘Full Path’ as shown below. Setting these two options will result in two fields – FileName, Sheet Names as the output –2_ListExcelSheet_InputData
  2. Add a ‘Formula’ transform. Set the ‘FileName’ with the ‘Query’ that’s needed as shown below. The purpose of the below query is to replace the ‘List of Sheet Names’ with the actual Sheet Name and in addition to that the ‘Range’ of data to be fetched. If we don’t specify this and just stick to ‘Sheet Name’, then the workflow would fail as the data is non-uniform. This is important to take note of. I am pasting the query for easy reference. Keep in mind of the tilde character –
    Replace([Filename], “<List of Sheet Names>”, “Select * from `“+[Sheet Names]+”$A1:B100000`“)
    3_ListExcelSheet_ForumlaTool
  3. Drag an ‘Macro Output’ and connect it to the ‘Filter’ transform.
  4. Drag a ‘Control Parameter’ on to the workflow. Connect the ‘search’ icon of Control Parameter to ‘lightning’ icon of the ‘Input Tool’. Doing so you would get an ‘Update Value’ transform in between both. Just leave it as is. By default it would select the ‘File – value’ as shown below. The purpose of dragging in the Control Input is to create a placeholder through which multiple excel files can be passed. If you are coming from SSIS background, you can say this is the equivalent of ‘ForEach’ file transform where the full file path is passed as a parameter.
    4_ListExcelSheet_UpdateValue
  5. Save the workflow as ‘List of sheets Macro.yxmc’ and the full workflow would look like as shown below. (Note- I have added ‘Annotation’ for Control Parameter, Input Tool and Formula Tool) –5_ListExcelSheets_Completed.png

Now we have a macro which can give the full path of the excel file along with the query that we need to get the data from. We now need another macro where we can put the query in and get the data. Remember anytime we need looping, macro is the way to go. The first step we did was just getting the sheet names from each excel file and modifying the file path with the query.

The second macro to do is fairly simple –

  1. Open a new workflow. Drag in a ‘Input Tool’ and connect it to one of the source excel files. In my case I connected it to the ‘Feb’ file. When you connect to the file, here is how ‘Choose Table or Specify Query’ window looks like –
    6_ObtainDataFromExcel_ChooseTable.png
  2. Do not choose any sheet name rather click on ‘SQL Editor’ and paste the following query and click ‘OK’ – SELECT * FROM February$A1:B100000
    as shown below-7_ObtainDataFromExcel_SQLEditor
  3. Drag in ‘Filter’ Transform and connect to the ‘Input Tool’. In the properties, select the column ‘Id’ and set the drop down to ‘Is Not Null’. Basically if you look at the query in the above step I have given arbitrary number B100000. The data may or many not be there. So we need to filter out empty data.
  4. Drag in an ‘Macro Output’ and connect it to the ‘Filter Transform’ above.
  5. Drag in a ‘Control Parameter’ and connect the ‘search’ icon of transform to the ‘lightning’ icon of the ‘Input Data’ transform. An ‘Update Value’ transform would appear in between and you don’t need to do anything. By default it will transform the ‘File – value’ as shown below – 8_ObtainDataFromExcel_InputData.png
  6. Save the workflow with name say – Obtain limited range from excel.yxmc. Here is how it would look like – 9_ObtainDataFromExcel_Overall

Okay, so we now have two macros, one for getting sheet names and modifying the full file path with the requisite query, the other for getting the data from the excel file. We now need another workflow to call these two macros and do our job.

  1. Open a new workflow. Drag in the directory tool and point the location to the path where the source files reside. Set the file specification as ‘.xlsx’ just so that we only get the excel files
  2. Drag in an ‘Formula’ transform and connect it to the directory tool. Add new column and give it a name say ‘FullPath_SheetNames’ and give it the following value – [FullPath]+”|<List of Sheet Names>”.
  3. Right-click on the blank space in the workflow, go to ‘Insert’->’Macro’ -> ‘List of Sheets’ as shown below- 10_ObtainDataFromExcel_InsertFirstMacro.png
  4. Connect the macro to the ‘Formula’ transform. In the ‘Properties’ box of the macro, set the ‘Choose list of sheets input field’ as ‘FullPath_SheetNames’. (Note- in case you have not done any annotations in the macro, then it would appear as Control Parameter Input’
  5. Drag in a ‘Filter’ transform and connect it to the above macro. Set the filter as – [Sheet Names] != “Summary”. This step I am doing because each of our files have two sheets and the sheet that we are interested in is not the ‘Summary’ one. I could have just put in one sheet in all files but I wanted to show you how you can if need be utilize all the sheets separately for different purposes.
  6. Right-click on the blank space in the workflow, go to ‘Insert’->’Macro’ -> ‘Obtain Limited range from Excel’ macro and connect it to the ‘Filter’ transform.
  7. In the properties of the second macro, set the value to ‘FileName’.
  8. Drag in a ‘Browse’ transform to look at the output. (here is where you would typically plug-in your Output Data tool in the real world scenario)

11_ExtractData_Overview

Post-running the workflow here is the output from Browse –
12_ExtractData_Output

That’s it. For my task I had to go through about 12 different excel files with various tab names and the out-of-the-box tools that Alteryx provides is so very powerful to get the job done.

Just falling in love with it.

Alteryx PostgreSQL Input – Character with Byte sequence error

This is one of the most troublesome errors that I had encountered for long time and finally at last I  found a way to get past it.

I kept getting the following error when trying to fetch data from my PostgreSQL source. This error was an arbitrary one which used to pop based on the data within. Here is how the standard error message is shown in Messages window of Alteryx –

Error: Input Data (11): Error SQLExecute: ERROR: character with byte sequence 0xe2 0x80 0xad in encoding “UTF8” has no equivalent in encoding “WIN1252”;
Error while executing the query

The byte sequence that I highlighted corresponds to blank space. I tried trimming out blank spaces in my data. I then got another error this time indicating another character. The first workaround to this problem that I applied was to create one more ODBC data source with a Unicode driver. Now that resulted in another problem altogether. All the date format of the input data had changed to text.

ODBC Admin.png

Here is the actual fix that helped me. Reading online I did see that one would need to change the setting from WIN1252 to UTF8. Now that I didn’t want to do at database level and I wasn’t sure where to put it. It is after bit of tinkering I see putting that in the Pre-Execute SQL Statement does the trick as shown below –

Input Tool

Problem solved.

Incremental Data Load using Alteryx

As I keep progressing on my journey with Alteryx, I can’t help keep thinking on exploring all the various ways with which this can be stretched and explored. Here are some of the ETL scenarios that I have in mind –

  1. Incremental data loads
  2. Loading files from folder for a certain date range and moving them to archive
  3. Error handling and logging
  4. Performance handling (loading ~1M records)
  5. Configurability and deployment across various environments
  6. Version control

These are what I can think of now. Let me start off this post with the first of the above scenarios i.e. incremental data loads. This is a quite common ETL scenarios that every developer gets to work on over course of his career.

Here is a sample staging table from along with sample data in it. This would become the source table –

create table stg_orders(
id int,
description varchar(10),
amount decimal(6,2),
created_date date
);

insert into stg_orders values (1,'Apples',20,'2017-12-15');
insert into stg_orders values (2,'Bananas',10,'2017-12-15');
insert into stg_orders values (3,'Mangoes',25,'2017-12-15');

Here is the destination table to which data is being loaded.

create table orders(
id int,
description varchar(10),
amount decimal(6,2),
created_date date
);

Incremental loading refers to the process of loading only changed data from source to destination. Identification of this ‘changed’ data would vary based on the business requirements. Most often it is chosen based on the datetime field, which is the case here.

First thing to ensure is to have a controller table at the destination that will hold the last loaded datetime. Below is the controller table that I am using for this demo –


create table controller(
last_refreshed_date date
);

With basic structure in place, let’s begin to assemble the workflow. Here is how the final output would look like –
1_Workflow
It’s THAT simple. Just three little transforms. That’s the beauty of Alteryx. All the nitty-gritty itsy bitsy column details are all completely hidden. Let’s look at each one of them. The first controller is a ‘Input Tool’ that gets the max last refreshed date value from the existing data.  Here is the query used for it. When the workflow is first run, the controller would not be having any data in it, hence I have put an arbitary date of 12th December, 2017. Ideally this value would be current date.-

select coalesce(max(last_refreshed_date),'2017-12-12') as last_refreshed_date
from controller;

The second tool is a Dynamic Input tool – ‘Get Orders data’ wherein the filter gets added on and requires bit more explanation.  Once you drag and drop Dynamic Input tool, here are the steps that are to be taken as shown below.

2_DynamicInput_SQLEditor

Click on ‘Edit’ button. In the ‘Connect to a File or Database’ click to obtain the source query and then in the SQL Editor, put the actual source query that fetches the data from the data from the source. As can be seen the date that I specified is an arbitary date. Once you put in the query click on ‘Ok’ in the current and subsequent window to close the wizard. Connect this to the previous transform i.e. the ‘Get Max Last Refreshed Date’ Input tool.
3_DynamicInput_ModifySQLQuery

At this point you are just connected to the source SQL query and we now need to configure it so that filter is udpated. Now select  ‘Modify SQL Query’ and click on ‘Add’ dropdown and choose ‘SQL: Update WHERE Clause’. This will pop-up a new window

This is where you can say ‘magic’ happens.  As you see above, the first part is where you need to select the appropriate part of the where clause. If you have multiple clauses in your WHERE clause, all of these appear in the drop-down. The wizard automatically reads in the filter and identifies the field that needs to be replaced. The second part is where you define the field with which you will be replacing, which in our case is the ‘last_refreshed_date’ and then click on ‘OK’.

4_DynamicInput_SQLWhereClause

Let’s get to the last part i.e. ‘Output Data’ tool – Load data into Orders and update controller table. This control has among many options – ‘Post Create SQL Statement’ which is what we are going to use. Here is the sql statement that I have put in it for –

BEGIN TRANSACTION;

INSERT INTO controller(
last_refreshed_date
)
SELECT MAX(created_date)
FROM    orders;

END TRANSACTION;

This is a feature that even informatica has but only as part of the source. Here in Alteryx, both ‘Input Data’ and ‘Output Data’ has this option. Here is how the output properties would look like –
6_OutputData_Properties

With all set let’s run the workflow. Here is the data from the orders table post-run –

7_Orders_Output
Here is the data in ‘Controller’ table –
8_Controller_Output_Run1

Let’s insert some more data in the source table –

insert into stg_orders values (4,'Apples',30,'2017-12-16');
insert into stg_orders values (5,'Bananas',2,'2017-12-17');

In this run, you can see that only 2 records get picked which is what is expected and here is the data from the orders table –
9_Orders_Output_Run2

That’s about it. Here are few points that I would like to point out –

1. In a typical ETL, the controller table would have few more columns such as Id, Total Records etc. basically a auditing table.
2. The source SQL Query may not be as simple as the one that is pasted in this demo but a complex one especially when loading data from a Operational Data Store (ODS) to a Data Warehouse (DW).
3. At no point of team we needed any variable to perform all these operations.


Alteryx – First and Lasting impressions

If not for the new job that I have joined I would not have heard of this tool at all. Alteryx is another kid on the block that is mix of ETL / Analysis / Reporting all blended into one. The reporting part hasn’t impressed me much but some of the the ETL/ Analsyis features that it has just blew me away. In this post I would like to point out few key areas where I feel this just aces miles ahead of SSIS (or) Informatica.

Installation
You just need to go to the site, click on the Download Now. This would then prompt you to register and you MUST enable to their subscriptions. Once done, you would have 14 day trial of the product. It’s that simple.

Preview Data at every single stage post run
At each stage of transformation one can see the data before and after the transformation post the execution of the workflow. I just can’t fathom how are they even doing this. Let me show you with an example

Here is a simple workflow that is taking student data as input, doing some check on Gender (if Male/Female) and then cocatenating first name and last name for both the flows.

1_StudentImport_Overview

If you are coming with a ETL background, you would be able to quickly latch on to the transformations and what they do because they are so intuitive. Even an hours video from youtube would be sufficient to quickly scale up on transformations. If you notice each of the transformations above, there are green button like icons before and after. They are basically input and output (as if you didn’t decipher already). Now let’s say the workflow is run. Post run, I can click on any of these buttons to see the data at that particular stage.

Let me pick ‘Identifiy Gender’ transformation. Once you click on the transformation, all the inputs and outputs of that transformation are available to be previewed. Seen below is how the input data looks like. My condition was to seperate them by Gender –
2_IdentifyGender_Input
If I want to see what the ‘T’ output rows look like (i.e. Males), I just click on it –

2_IdentifyGender_True
Now let me have a look at the ‘F’ output rows –
3_IdentifyGender_False
Imagine this being the case at every stage of the transformation. It’s just incredible to be able to see how your business rules are working at every stage.
Let me just repeat one more time, if you haven’t read the sub heading, this preview is POST-RUN. I just can’t think of any alternative for this in either SSIS/Informatica.

Testing the DFT without Output-
Just scroll little back up and see the screenshot of the workflow I posted. It doesn’t contain an ‘Output’. The last transformation that you see is just a UNION ALL. Say if you are developing a POC or just testing somethings out, you avoid the necessity to create a destination and then dumping the data. Of course, Trash Destination comes quickly to mind from SSIS stack but that’s an add-on and not out-of-the-box feature. I can’t think of any in Informatica though.

Multicasting
Pretty much every single transformation’s output you can multicast and then branch off to do some entirely new logic altogether.

Dynamic column propogation-
I have been saving the best for the last. It has this incredibly advanced capability of bringing in dynamic columns just as if they have been there all along.  Let’s say in the data above, I perform two changes to the input file –
-Added new column say Location at the end
-Added new column Is Married after ‘Last Name’ column

Without doing any changes to the workflow, it just runs without throwing any error and here is my output from ‘Union’ transform –

4_ColumnAddition_WorkflowRun

HOLY COW! It’s just mind-blowing, ain’t it. In terms of data modifications, it was pretty drastic, as in new columns were added not just at the end but also in between, and Alteryx just doesn’t care about it. It just works!

I am sure, I am just scraping through the tip of the iceberg and there is HUGE amount of exploration left to do. What is also fantastic about this product is the community behind it.

Their community forums and learning channels are all free for anyone to ask and learn much like MSDN community or Informatica ones. They have weekly challenges running which are good fun to flex your muscle and give it a try. The whole interface though I feel they can improve on. I feel bit claustrophobic with all the overbearing green color theme and design but you get used to it.

All in all I am loving it. Watch out for future posts where I detail how it fares performance wise, error handling, configurability, looping, dynamic data parsing etc.