Once the base Macro is set, we now need another macro which can spit out the sheet names from a given excel file. Perform the following steps to create this macro – 1. Drag in ‘Input Tool’ and connect to any of the existing excel file say ‘Movies.xlsx’. On connection, chose the option – Import only the list of sheet names ( as shown below ). Additionally in the configuration pane of the tool set ‘Output File Name as Field’ to ‘Full Path’
2. Drag in a ‘Formula’ tool and create a new field ‘FullPath’ with the following formula TrimRight([FileName],'<List of Sheet Names>’)+”‘”+[Sheet Names]+”$’” 3. Drag in a ‘Select’ tool and deselect everything but the ‘FullPath’ field. 4. Drag in a ‘Macro Output’. Here is how it should look like –
Run the workflow and ensure full path is being shown –
As my current contract gets a last breath of life and I begin to search for opportunities, this one question has really been doing rounds in my mind. Let me further elaborate on that question before people jump the gun. Does experience in particular technology really matter, if you already have knowledge in related subject matter?
For over a decade since starting my career, I had worked with MSBI suite of technologies with PowerShell, C# thrown in. It wasn’t until I came here to Sydney to work for a different client (LINK Group) where I had the opportunity of working with different sets of tools such as Informatica and Oracle. Things were going good.
As the work came through, I adapted myself to learning the new tools and working with them. It didn’t take time to really upskill. It was then I got a lucky break. Vinay Sammineni of Cognitivo Consulting and his partner Alan Hsiao took upon my CV (from a mutual friend) and saw that I had very good data warehousing and SQL skills.
They phoned me and asked me if I was interested to work for Amaysim who were looking for a data analyst with the skills required being – Alteryx, Tableau, Amazon Redshift and stated further that they have also set-up an interview with them. This was quite a shock and I clearly remember asking them multiple times if they have gone through my CV as I didn’t have any experience in any of them up till that point.
The interview with Jacquie went well and the questions were mostly focused on standard SQL and my past work experience – the challenges that I had faced, dealing with demanding managers etc. She then went on about the tools the company were using and she was quite blasé about me not knowing them and said you shouldn’t find any difficulty getting acclimatised with them.
That was how my new path began to take shape. I honestly can’t thank enough the folks at Amaysim and also Vinay and Alan for believing in me and my abilities to transition my existing knowledge and using it to develop new ones.
As I start applying for jobs for Data Engineering roles, I hope I come across a company who can see my capability to transition my existing breadth of knowledge and not exactly on the tech skills that I work with.
As the title states, the requirement is simple – Extract max date from multiple excel files with varying schemas. I had a task where the requirement was to go through about 30 odd excel files and pick max date from each of them for monitoring purpose. All the files do not have necessarily have same schemas i.e. same number of columns or sheet name for that matter.
Just looking at the requirement, I knew this is a cakewalk for Alteryx. You see once you get a small taste of how a macro works, you will begin to realize the incredible power of the ability to customize every single component of the workflow – input tool, output tool, filter, join. Anything, you just name it, it will do it for you. It will put those tiny black thingy on the controls and hallelujah! you are set.
I did some simple mind calc and bam, I knew I could rig this up effortlessly.
Without any further ado, let’s get into this with an example. Like every other person out there I consume a lot, I mean a LOT of audio/movie content be it movies, series or podcasts. So I have three files now to keep track of these –
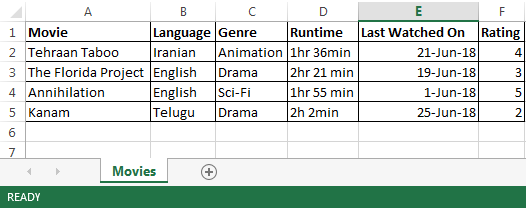
1. Movies Seen.xlsx containing the following data-
2. Series Seen.xlsx containing the following data –
3.Podcasts Heard.xlsx containing the following data –
As can be seen all the files above are having different column names and different sheet names too. My goal is to get when was the last movie that I saw or series I saw or podcast I heard.
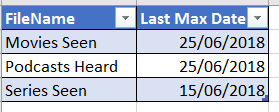
Here is the expected result –
Solution –
My first step was to create a lookup file – media_config_data.csv which looks like below –
We will make use of this later. First let’s create one simple workflow that gives the max date from one of the files above i.e. Movies Seen.xlsx. Here is the screenshot of the base workflow –
The workflow does following things – 1. Use ‘Input Data’ and connect to the excel file. 2. Add a ‘Formula Tool’ and create new column ‘Max Date’ and set it to ‘Last Watched On’ 3. Add a ‘Select’ transform and deselect all the columns excepting the ‘Max Date’ and ‘File Name’ column 4. Add a ‘Summarize’ transform and set it as ‘Last Max Date’ 5. Generates a dummy output
Ensure that the workflow works without any error. The next step is to create a ‘macro’ out of it. Some of ‘comments’ in the above screen shot should give an idea of what is going to happen.
Step 1 – Macro to obtain Max of Date column
Perform the following steps to create the macro. This is where the actual magic happens – 1. Drag in three ‘Control Paramters’ on to the canvas and set the labels as – Excel Name, Sheet Name, Date Column Name. 2. Connect the ‘Excel Name’ control parameter’s magnifying glass to lightning strike of ‘Input Tool’. An ‘Update value’ action tool will popup. 3. Perform the following actions on selecting the ‘Update value’ tool as shown below –
4. Perform the steps (2) and (3) for Sheet Name control parameter and in following through ‘Replace a specific string:’ Movies. 5. Now connect the ‘Date Column Name’ control parameter to the lightning strike of ‘Formula’ tool and perform the actions as seen below –
6. Lastly remove the ‘Output’ tool and connect ‘Macro output’. 7. Save the file as ‘Obtain Max Date from Excel File’.
Here is how the macro would like like once done –
Step 2 – Workflow to process the files This workflow is where we use Directory tool, to obtain all the excel files and get file name and full file path, join it up with config file and obtain the three variables that the above macro needs – 1. Excel Name 2. Sheet Name 3. Date Column Name Here is how the workflow would look like –
On running the workflow, we get the desired output as shown below –
I attended a Town Hall meeting yesterday of Genpact from who I currently contract with. It was very interesting meeting with about 70 odd people attending it. One of the things that pleasantly surprised me is the strength of non-Indian representation. Genpact is one of the mid-tier IT firms based out of in India and having worked for such consultancy firms before I expected large Indian diaspora with occasional Aussies.
This was the very case in the first company that I worked here in Australia and contracting for LINK Group, as a MindTree employee. In the annual parties that we had back then, I could count with my fingers on number of Aussies in the whole pact. So it was quite a sight to see a change.
The one difference I can see right away is whereas in MindTree there was predominant presence of developers, here I could see the opposite. This would only mean , at least to me, expansion is yet to happen for the company. There were two main speakers who gave an update of the company’s outlook, how it fared from last year, exciting new clients that they bagged this year. The company looks to be heading very strong with really good performance outlook.
Right at the end, the meeting then veered into employee feedback they obtained and what it meant to them, how they are going to address it etc. It was it this point, I was kind of zoned out.
It reminded me of all the times that I have been a salaried full-time employee, for whom talks like this used to invigorate a sense of belonging in me. Ever since I have been contracting, events like this put a different perspective on thinking.
Post the meeting, I stayed on for a while just to have a casual chat with any of the folks there. It was during that time I got asked – so who do you really work for?
That’s when for the first time, I got a sense of liberation. Being on contract, is in a way being on your own. In truest sense the answer would be I work for the client as that is my primary responsibility. The question, though, is much broader than that. In absence of allegiance, for whom am I really working?
Ever since the day I have started working, my first and foremost dedication is to the quality of work I deliver. It has to be flawless, easily scalable, extensible and most importantly well-documented. It is the work that gives me the utmost satisfaction. The one thing I have consciously decided to focus on now is to improve my technical knowledge and gain inroads into big data engineering space.
Day #2 of my course involved getting over view of data modelling. The course started off with basic introduction courses for relational and cloud databases. The course per se was touching only on basic terms and bit underwhelming w.r.t to intro to PostgreSQL database.
Cassandra database is the next hurdle to cross and work on.
Yesterday marked my first day in the Data Engineer Nanodegree course offered by Udacity. After thinking a lot on how to best equip myself and enrich my knowledge in the world of Big Data and taking the steps towards it, this course came along talking about THE essential things that I wanted to learn – Cloud data warehouses, Spark and Data Lakes.
What further sealed the deal was I am working on a project where we are using Spark and Data Lake as well. However, it is being handled by a separate team. My involvement so far has been to the extent of writing Impala queries, creating data structure, testing the sqoop queries and occasionally query tuning by looking at the logs to understand which partitioning is better. I reasoned that doing this course will give me a better ammo to pitch myself to get into the Data Lake team. Time will tell (fingers crossed)
I have been longing for an opportunity to pivot my career from the traditional BI to Data Engineering on Big Data Platforms. Here is a course that not only promises to teach the nitty gritties of being a Data Engineer with a proper structured methodical teaching but also help with shaping up my career via services like resume editing and LinkedIn page setup. Long way to go for that.
So here is what my Day 1 (yesterday) felt like so far- Absolutely wonderful! In the first few videos I have really gotten to know what Data Engineer really means and what other titles actually mean and how they stack up.
What resonated me a lot was this article that was one of the materials to read up. It spoke volumes to me as this was exactly the path I had been following all through my career. I started off writing ETL packages via SSIS on traditional OLTP – OLAP databases, designing cubes off of it, designing and developing reports based on it.
All these have stopped about 3 years ago and it was only a year ago, I am completely off it. I am now working on data sources which are disparate in nature or are built on the Data Lake. This is a brand new world for me and am loving every part of it. The challenges are different, more exciting and there is SO much more to be done.
Looking at the evolution of how data has proliferated and how the traditional RDBMS technologies are not sufficient to cater the growing needs of business, I am happy to see the organic growth in me. Of course, to be where I am today, the forces that have shaped me are largely due to the work done in BI but stepping into new future I need more ammo.
Coming back to the course, I started off with Data Modelling basics and some intro into PostgreSQL.
Next post would be more structured. The purpose of this post with # tag is to motivate myself to read every day and share my thoughts on my learning.
One of the most common requirement that comes when creating Alteryx Apps involving a dropdown is to have (Select All) as one of the values. This value, if you have not inferred by now, would not be part of a data source but something we add to it. Basically I am trying to simulate what Excel does when ‘Sort & Filter’ is enabled as seen below –
In this post I am going to demonstrate how to add this value in the drop down and how it then needs to be consumed in filtering the datasource. This post will have the following sections –
Get Dummy Data
Add (Select All) to Dropdown tool
Filter dataset using the ‘(Select All)’
1. Get Dummy Data
The test data which I am going to use for this post is the highest grossing Marvel Movies which I am getting from this link – Marvel Comics Movies at Box Office. I copied the first table and stored it in my local disk. In my Alteryx App, I have dragged this data as a Input Tool. Used DateTime Tool and Filter to create a unique Date Format.
Sample Data is shown below –
2. Create Filter with (Select All) in it
As next step I am going to create one Dropdown filter – ‘Studio’. For this post I am choosing the option – Manually set values (Name:Value – one per line). I have entered the values manually. As you can see I have kept the option ‘(Select All)’ as the first entry.
If the data is coming via connected tool, ensure that source data for the filter is joined with the ‘(Select All)’ manual text data. Likewise, if it’s coming from external source, add this entry. Essentially because this value doesn’t exist, we would need to add it.
3. Filter dataset using the ‘(Select All)’
We identified our column on which we need to filter. We have created the values for the filter. It is now time to actually ‘filter’. I have now dragged in a Filter transform. Too much repetitive, isn’t it. I will now ‘filter’ (pardon the pun) going forward. Put the following entry for the ‘Customer Filter’ option as shown below –
Here is what we need to do next – 1. Connect the ‘search’ icon of ‘Studio’ dropdown to the lightning bolt of ‘Filter on Studio’ Operator. A ‘Update value’ operator pops up in between. 2. Click on the operator. Under the ‘Value or Attribute to Update:’ section, click on “Expression – value = ….” 3. Click on the checkbox ‘Replace a specific string:’ and just keep the value as ‘<studio>’ (without quotes) as can be seen below-
That’s it. Essentially the logic here is the inclusion of OR expression of place holder value equal to ‘(Select All)’. When a specific filter is selected, the select all expression goes false and when ‘(Select All)’ option is selected, well this one gets true and essentially the filter will flow through all the data.
Same logic can be used for filtering the data say in a Dynamic Input with data coming from a particular SQL data source. Code for that would look like this –
select * from really_awesome_table where ( that_parameter = ‘<this_value>’ or ‘(Select All)’ = ‘<this_value>’ )
To test it out I have put in a summarize transform to group by ‘Studio’ and ‘Total Movies’. Let’s run the workflow. Here is how the wizard looks like –
Here is how the output looks like, executing with (Select All) and individual Filter –
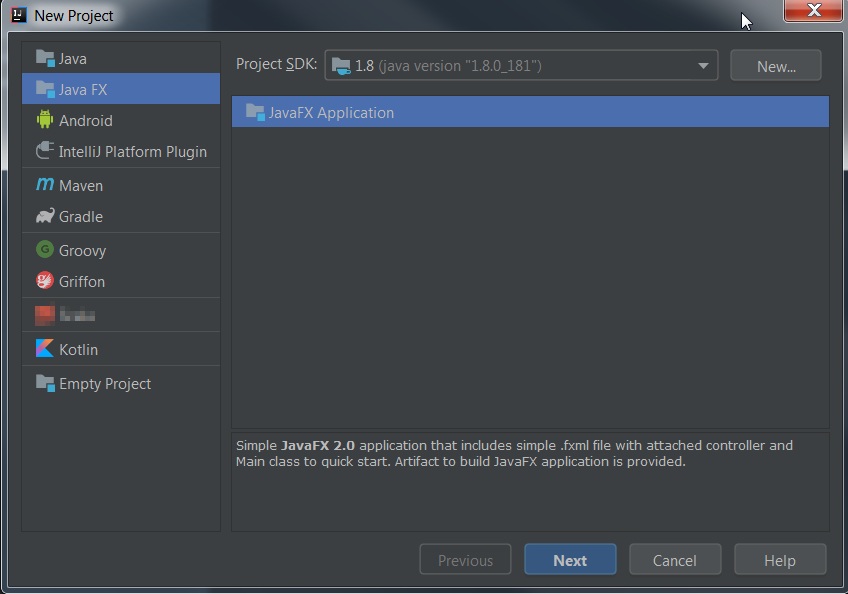
Have you come across the problem of not being able to select ‘Scala’ as part of the ‘New Project’ in IntelliJ as shown below (psst – there is Scala present, I know. For imagination sake let’s say you don’t see it, kapise?) ?
First thing when you google, everything it points out is for you to installing ‘Scala plugin’.
Let’s say you do have the plugin installed and available and enabled as shown below but even then you don’t find it in the ‘New Project’ –
This usually happens say when you have upgraded your IntelliJ or re-installed your IntelliJ with a different version at different time and have imported the old settings. The best thing to do to get over this error is navigate to the folder – C:\users\<username>\ and delete all the folders starting with .IdeaICxxxx as highlighted below –
That’s it. Now open up your IntelliJ again, all should be good now to get going. Of course this time around you would need to get your JDK and Scala libraries set up. Follow this blog – link
While working on one of the workflows of Alteryx with PostgreSQL data sources, I started getting this wierd error –
Error SQLExecute: Out of memory while reading tuples.; memory allocation error???
This was a unusual error. For one I was running this not on my local machine but on the Gallery which was governed by the server. Also I felt Alteryx folks could have done away with three question marks (???). It feels as if we are being questioned on the memory allocation and it’s just waiting for some confirmation.
This is one of those classic it-works-in-dev-not-in-prod kind of problem. I then went back and compared the two ODBC data source settings across both the environments. It was here I could see the problem. You need to set the setting for PostgreSQL ODBC data source to have ‘Use Declare/Fetch’ option set in.
Open up the ‘ODBC Data Source Administrator’ window after running it as administrator. Click on the ‘Data Source’ that you are using and click on ‘Configure’. In the ‘PostgreSQL ANSI ODBC Driver (psqlODBC) Setup’ window, click on ‘Datasource’. Ensure that the checkbox ‘Use Declare/Fetch’ is checked and then click on ‘OK’ and close the subsequent windows. This setting resolves the issue. Below is the screenshot
Figuring out how to run Powershell scripts using Alteryx has been a very harrowing experience for me. I had used ‘Run command’ tasks before but I remember even then it was quite a struggle to get it up and running.
The help files from Alteryx with regards to this task is abysmal. It gives an explanation of each task within the command but doesn’t really tell you how to go about doing it step by step. The nearest help from Alteryx forum that I could get is this. Here is my attempt to make it easier for folks who find themselves in similar situation.
Task Description
I need to create a sub-folder under multiple folders. This ‘sub-folder’ name is dynamically determined during run-time depending on the input file name to the workflow.
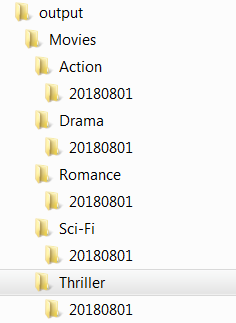
For example, say my input file is – movies_released_20180801.csv. I have a set of folders under the parent directory – Movies as shown below –
I need to create a folder called ‘20180801’ under each of the sub-folders, if it doesn’t exist already. As each month passes, new sub-folders would need to be created.
Solution My first step for the solution is to create a powershell script that can perform the sub-folder creation. Here is my script –
#Get Parent directory
$root = "C:\Users\kvankada\Documents\Personal\Learning\output\Movies"

#Get all directories present in the parent folder
$folders = Get-ChildItem -Path $root -Directory

#Iterate through each item within the list of parent folder
foreach($folder in $folders)
{
  #Get the subfolder full path
  $Subfolder = $folder.FullName + "\20180801"

   #Check to see if the folder exists
   if(! (Test-Path -Path $Subfolder))
   {
      #If it does not exist, create new sub-folder under each item
      New-Item -ItemType directory -Path $Subfolder
   }
}
The root folder of the above script file comes from the Alteryx workflow. The next steps now starts looking crazy but bear with me. It will all make sense. Drag in a ‘Input Task’ with following two columns –
The Path should be a valid path and accessible to the user. It can be a UNC path as well. Drag in a ‘Formula’. Create two new columns Subfolder and Powershell_Script with following values as shown below –
As can be seen the new column Powershell_Script is nothing but the entirety of powershell script with ‘Subfolder’ being dynamically sent. Drag in a ‘Select’ task. De-select all the fields excepting ‘Path’ and ‘Powershell_Script’. Drag in a ‘Run Command’ task. Click on ‘Output’ under ‘Write Source [Optional]’ in the configuration window as shown below –
In the ‘Write to File or Database’ file, click on the drop-down and select ‘File’. A ‘Save a data file’ window pops up. Here chose any location and save the file as say ‘temp_powershell.csv’. I have chosen a ‘temp’ folder as my file location. In the ‘Alterx Designer’ the following changes still needs to be done against following settings –
Delimiters – \0
First Row Contains Field Names – Unchecked
Quote Output Fields – Never
Take File/Table Name From Field – Tick the checkbox. Chose the option as ‘Change Entire File Path’ Field Containing File Name or Part of File Name – Path Keep Field in Output – Unchecked
The final dialog would look like as shown below. Changes have been highlighted. Click on ‘OK’ post completion –
The reason we need to do this is because Alteryx doesn’t provide a way to save the output to Powershell script file. We need to get the content of Powershell first saved as CSV and then the whole file being renamed via our ‘Path’ value that we have provided in the workflow. It’s a roundabout way of doing things.
Continuing the ‘Run Command’ Task configuration and set them as shown below. Pay particular attention to double quotes in the ‘Command Arguments [Optional]’ section. It is absolutely necessary.-
That’s it. Now you are set to run. There is no need to configure the output of ‘Run Command’ task. If you do need to use, then ‘Read Results’ path needs to be configured. I might do a continuation post later on for that. For now you can ignore the need for additional output configuration. Here is how the final workflow looks like –
I ran the workflow and here is my output –
For final workflow in the ‘Run Command’ task, you would need to set ‘Run Minimized’ and ‘Run Silent’ check boxes to have smoother run. As you are testing out, it would be important for debugging purpose to leave them unchecked. In that manner you would see if you have any errors popping out.
That’s it. That’s how it is done in Alteryx. It took me quite a lot of tinkering and experimenting to get the desired result. Hope this post has helped in solving your own problems while getting Powershell scripts run via Alteryx.